Showing posts with label Pottery. Show all posts

Sunday, March 10, 2013

The local talent - Njalikwa Chongwe


I just thought it worth mentioning that here in Western Australia we have some very capable quiet achievers among us in the ceramic community such as Njalikwa Chongwe at Zinongo Pottery in South Fremantle.  

He makes and fires low fired Raku and high fired Stoneware ceramic pieces. He and his partner Jacqueline Rodrigues, set up the gallery 25 years ago.  He  makes beautiful colourful raku work with his own very distinctive palette and style and an online shop on his website.  He was a popular demonstrator at POTOBER 2013 put on by CAAWA and has a cool channel on YouTube.  
 Not everything happens in Fremantle but many of us are based near there.  Sandra Black and Njaliwke are in South Freo (yes we shorten the name of everything), Fleur Schell is in North Freo - (with some really exciting opportunities about to be announced soon), so is Alana McVeigh and I am just across the Swan River in East Freo.  Are there no ceramists in West Freo I hear you ponder?  Darl, if there are, they'll be pretty wet.  West Freo is THE INDIAN OCEAN and beautiful it is too (sharks aside).  See my new desktop image, by Peter Zuvela.   Image source Peter Zuvela , my fave photographer.  


Sunday, March 3, 2013

You learn something new every (Tuesday)

I am up to my third Maiolica lesson at La Maiolica in Fremantle with Cate Cosi and Amanda and it gives me two hours of the simple pleasure of trying something new and feeling free enough to think of it as 'play' and not as a challenge.  Click on the links above to get the history of Maiolica, you won't be sorry.  Like most new skills, it is not as easy as it looks.  Here is my bowl ...  Gigi threw it in Italian terracotta, Amanda and Cate are the decorating experts.  Mine is on the top left in each of these two photos, my husband has already 'bagsed' it for his brekky bowl because he likes cheerful things. 


For those who don't know, Maiolica (aka Majolica - I just stuck a 'j' in there but the Majorcan's did it first) is tin-glazed terracotta earthenware, usually with painted coloured brushwork.  Cate and her husband Gigi run the very successful “La Majolica” pottery in Fremantle, specialising in traditional Italian designs based on how it is done on the Amalfi coast, where Gigi was born. Cate has been decorating Majolica ware for many years with Amanda's assistance and Gigi does the throwing on a wheel that'd strike most as very odd.  See above where Amanda's left hand is on a plastic covered pot (ignore the plate in front of her), well that is where the wheel head is, offset by most people's standards and you'd think, a chiropractor's nightmare. I am told it is really comfortable and that you can rest against the wall while you throw.  

I've long, long been interested in Maiolica, the late, great Matthias Ostermann taught a workshop here in Perth in about 2004, he was amazing!  I have his book and also the great DVD by Linda Arbuckle on the subject.  I mention these in case you aren't as fortunate as I am with La Maiolica nearby.  

When you see something demonstrated by someone truly skilled the whole exercise seems to flow easily, the easy handling of the item, the flowing brushstrokes, the seemingly absentminded stirring and dipping into the colour all belie hundreds of hours of practice and lessons learnt.  This is why learning from such practitioners is a joy.  I've been wanting to do this for at least 20 years.  

Amanda and Cate decorate on adjustable banding wheels set on the floor. They explained about working with the right height, your comfort while you work and supporting your hands, types of brushes, care of brushes, and about mixing and applying the colour ...  how to flip over the ware without chipping off the powdery unfired glaze.  


Cate showing us how to practice 'banding' with water onto plain terracotta pots to get the feel of applying the colour to the glazed but unfired tin-glazed bowls.  The addition of 5-10% tin oxide to a clear earthenware glaze forms a lovely white opaque glaze onto which the colours, stains + fritt can be painted. Sounds easy, right?  La Maiolica import their materials for consistency and wow what colours can be achieved.  


We painted tiles in week one to illustrate the impact of one, two, then three brushstrokes over each other.  They colours are known by their Italian names as they, the clay and glaze are imported from Italy.  Here is mine below, before and after firing.


For week two we painted bowls based on this pattern but were free to use our own palettes and embellish 

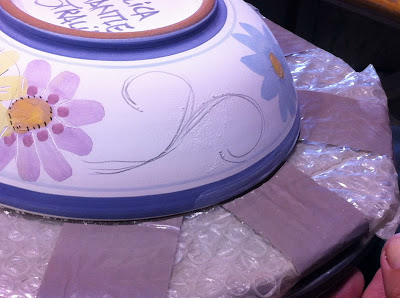
Notice the wooden batt covered in bubblewrap (bubbles inside) to give a cushioned surface to protect the glazed work - which is still unfired remember...
 and here Cate is marking outlines for the painted bands with a solid graphite pencil, 
then banding with pigment and brush
Cate had the bands (stripes) painted on in the blink of an eye and the ends met - unlike mine :>D
then she marks out the areas for applying and building up the pattern.  
She places a wooden batt over the bowl, sandwiching it and flipping it over to decorate the interior.

Week three - a floral pattern, at this point we students are getting a bit cocky and 'gung-ho', ready to take on anything because it is a very enjoyable skill to learn.  Amanda told me how although she'd been to art school, her training at La Maiolica took place over years by gradually building up one skill after another.  Given what they produce at La Maiolica, I am not surprised at all.  The work there is full of colour, life and joy and beautifully executed.  

above and below, creating the flowers and baroque swirly fronds which divide the space but unify the design too
then the bowl is inverted to complete the banding on the rim and a central motif 
We got talking about this book, which I will order on The Book Depository asap, unless you, my dear readers, have a better source.  It sounds like my kind of reading and I believe there was a TV programme on Colour too which tied in so I might ask at our local Jumbo Video to see if they have the TV programme on DVD.  Happy Days to you all!


OK, that took a lot of uploading time, it was practically a magazine article.  Let's see what all the other potters are doing at http://mudcolony.blogspot.com.au

PLEASE NOTE:All text in this blog posting is copyright of Elaine Bradley, Ceramic Artist, Western Australia unless quoting from another source.  All photographs in this blog posting are copyright of Elaine Bradley unless otherwise stated.  No responsibility can be taken for external links.  Please report any errors in crediting photographs, sources or facts to the author in order to allow her to rectify the matter.  Your response or feedback is welcome.


Sunday, October 21, 2012

Backwards and forwards with laser decals

Yes I have heaps on Katrina Chaytor to tell you but I may not get that done this weekend, stacks going on family wise.  As I compose my thoughts on the huge amount of information gleaned watching Katrina in action at POTober - I want to mention a hint or two about laser decals that I may not have shared before.  It may influence how you go about your decal work.  Please excuse if I blogged this already.

Here are a couple of slipcast  bowls (Keane's JCast I think) onto which I applied laser decals post glaze firing, taking the decal firing to 1060 degrees C, way higher than normal onglaze decals which are usually around 750-800 degrees C (can't remember how to find the degree sign without getting distracted).  Can you see the difference?  One bowl has far clearer images than the other.  The least clear image is from the decal that was applied in the normal waterslide manner.  You trim your decal, soak it in water, apply it to the glazed ware face up and slide the cream card backing away from under the printed image leaving behind just the black laser printed image on fine transparent plastic, squeegeeing it into place and removing air or water from behind.  Easy right?  It really is exactly like those toy tattoos you used to play with as a kid.

bowls and decals by Elaine Bradley, drawn design of decals by Emma Vinkovic
Below the left hand bowl has a better, clearer image than that on the right - why?  This happened when I applied the decal onto the ware 'back to front' - face down, i.e. TONER side down, without relying on the waterslide effect to put it in place, and without the gummy layer between the decal and the backing paper to help it adhere to the ware.  I sometimes put a lick of gum arabic betwwen ware and decal on to get a bond going.  It seems to have kept more of the print/toner that was printed on the decal than the other bowl.  I think it is worth that teeny bit for effort for such a more defined result.


Below is a collage of laser decals applied to a store bought plate - before and after firing.

Right now I am experimenting optimistically with printing with cobalt in the toner cartridge.  I'll post the fired results when they are ready.  I doubt I'll get to finishing my post on Katrina's work.  So tired ... a local party kept my whole street awake and I am a yawning wreck.  See you soon, possibly over at 
Mud Colony blog where all the best clayfolk gather with their blogs ... come on.  We love feedback, so talk to us.  

PLEASE NOTE:
All text in this blog posting is copyright of Elaine Bradley, Ceramic Artist, Western Australia unless quoting from another source.  All photographs in this blog posting are copyright of Elaine Bradley unless otherwise stated.  No responsibility can be taken for external links.  Please report any errors in crediting photographs, sources or facts to the author in order to allow her to rectify the matter.  Your response or feedback is welcome.

Monday, September 3, 2012

3D PRINTING IN PERTH CIT, a continuing story.

Left an early trial 3D print in clay (unfired) , right, a plastic 'raft' printed by 3D printer


The blogging mojo has been absent in the past couple of weeks due to plain busyness, and yet, of course, so much has been going on in my world.  For one thing teaching at CIT ceramics department has been a wonderful challenge and I am loving being part of the place.  The students are a great bunch and often surprise themselves when they dredge up a previously unknown resourcefulness or ability to put into their clay work.  I loaded a kiln last week full of their handmade teapots and boxes, we are moving onto Wall Art now and making simple drop moulds to replicate their  forms with. 

Meanwhile Graham Hay continues with his residency at CIT and tweaks and twiddles with the 3D printer CIT recently purchased.  It came in kit form and took a while to build. I imagine a ready made one would have cost a lot more given how many man hours went into building it.  The 3D printer was designed to print with a low temperature meltable plastic, this is fed into the printer from what looks like a roll of cable – but the cable is in fact the plastic consumable it prints with. 

In normal parlance the concept of printing entails the laying down of an ‘ink’ of some kind onto a flat substrate – usually paper.  The ink sits on the substrate and dries whether it is a screen print or an inkjet or laserjet of text or images.  Sometimes an ink or paint is printed where we can see and feel the change in surface where the ink sits upon the surface. 

In the case of 3D we are printing but layer upon layer and building upwards from the horizontal plane into a 3D form instead of across a flat 2D surface. 

There were weeks of calibrating our 3D printer and once that was done the hard part now starts.  Now the development of a suitable clay body is underway, one that will pipe through the printer under gentle hydraulic pressure – there is a large pressurised air pump attached.  So as well as the 3D printer a source of compressed air plus a computer are required to make anything happen.  The printed/extruded/piped clay mustn’t be too liquid or it will flop and flow, but must be soft enough to extrude and sit upon itself to build up layer upon layer to create a 3D form. 

I am assuming that you dear reader are smart enough to ‘get it’ if I threw in some hi tech terminology, I am putting this all into my own ‘laymans terms’ to try to explain it. 

So the printed clay, think of a coil pot but the printer is placing the mini ‘coils’, has to hold itself up and take weight while the printer head moves around the form laying down the clay – as directed by the computer.  Personally I find this whole subject completely fascinating.  I love modern technology and materials and I literally lie in bed at night thinking of what the printer might make and what might make the perfect clay composition to work best.  

Here is a short clip of me asking Graham about the printer.

There have been lots of trials and observations of the result of each tweak and change.  Graham lays out the tangible evidence of each test print in sequence on the long table at his station in the ceramics area to be handled and noted, prompting enthusiastic interest and discussion. 

 More – as it happens! 

Now, although I have missed the Mud Colony deadline – let’s hop over there anyhow and see what the other clay bloggers have been doing.  


Thursday, June 21, 2012

Coming around again

Oh dear, a cliché already, using a song title (Carly Simon's) for a post title.  I mentioned before that I am doing a residency at Central TAFE - aka Central Institute of Technology, Perth in the ceramics department so I will talk a little more of that.  I applied to Central about eighteen months ago when I only had a small but purpose built studio in the back garden.  Then I was lucky enough to rent a second work space for hand building and printing in Fremantle, close to home but up a stairs, albeit a very handsome stairs in the historical Old Customs House Building in Phillimore Street.   At Central I've been making large platters and purging the need to do just that, to explore engobes and textural glazes and now, unexpectedly, after making about ten platters, finding myself wanting to get back to the wheel, play with porcelain, make fine, thin vessels - what for? To glaze, to decorate, to light from inside with candles to make best use of the translucency of porcelain, to get glowy thin melty glassy rims, to put flowers in, or small fruit, to hang glazes on the white canvas of Southern Ice porcelain - did I say I had the answers yet?  I still assert that throwing with Southern Ice feels like I imagine throwing with Philadelphia Cream Cheese would feel.
I'd show you, but I keep forgetting to take photos because time is running out and I am getting quite a lot done.  But this lure of the potter's wheel got me thinking, and trawling and I found some good videos to show you that kind of illustrate the contentment and zen-ness of working with clay.
Anne Mette Hjortshøj
I went back to bed this very cold morning after sending the lads off to school,  got under the king sized electric duvet (or 'doona' to Aussies), snuggled up with Poppy - my cocker spaniel and we watched pottery vids on Vimeo on the iPad such as  Anne Mette Hjortshøj in Denmark, I have shared that one before, and
Rocking Bowl by Karin Eriksson
Karin Eriksson of Manos, in Stockholm, Sweden and Phil Rogers in the UK.   I think new pottery students should see these vids, to be inspired and excited and embraced into the world of throwing.
Now back to real life, supermarkets and work.  I hope your day treats you well,  especially you AC, hope 'the power' comes back on so your (magic) power comes back! Now get off your computer and make something.
Oh and did I mention yet that you lovely readers should hop on over to Mud Colony regularly, at least every week, to see what a growing number potters who blog have to say about their week and work.  Maybe you could join in with  your blog?
Phil Rogers throwing a Yunomi


Tuesday, April 24, 2012

Progress

Easter is over and on to another term.  I am enjoying the kickback time with our boys who have a few extra days at home but it plays havoc with my work habits.  This week I start teaching a class at Challenger TAFE in Rockingham, Print on Clay stuff, over three Thursdays.  I will try to grab some snaps of the progress there.
For the Introduction to Throwing class last term at CIT we spent the last class glazing and the students took to it like a duck to water.  They were the perfect students. I explained why not to double dip pots from one bucket of glaze to another  - to avoid contamination of the glazes and they were hyper vigilant about it.  Now their work is ready to be collected, and I hope they will be thrilled. Here they are signing their work before putting them in for bisque firing,.